Making of Amulet - Flatting
This is a tutorial on the flatting of an Amulet page. Flatting is the process of preparing the page files for the coloring, and it makes image area selection easier. This particular page was flatted by Alan Beadle, and now I'll use it as an example of how to do this right. Thanks Alan!

CLEANING THE PAGES - First, we will need to clean the pages. Begin by opening the 600 dpi linework file. These pages are scanned in on a cheap Epson Perfection 2400 scanner and are done in pencil, so there are plenty of unwanted artifacts on the image (eraser shavings, paper texture, etc).
Note: These first few steps may not be necessary for your files. I clean most of the pages when I scan them, so only do this if the file is still very dirty. This is something that may happen later on down the line as things get hectic. For now, concentrate more on the color portion.

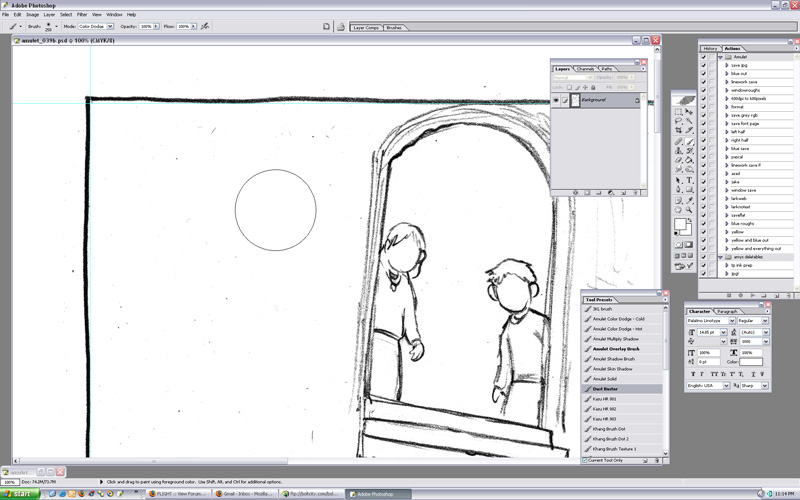
Take a large soft round brush, select the color white, and set the brush mode to "color dodge" (above left). This is what I call the dust buster, a trick I learned from my friend Khang Le. It's a brush that will eliminate any grey specks but will preserve the darkest blacks. You want to avoid getting close to the linework, of course, but this is an easy way to get rid of large swaths of artifacts without completely losing the original lines.

After cleaning up with the dust buster, using a solid white eraser or brush will help get rid of the pure black specks. Make sure to SAVE the file as a grayscale image at 600 dpi.
Leave this file aside and leave it at 600 dpi. In the end, you will have two files. One grayscale linework page at 600 dpi and another CMYK flatted page at 300 dpi. When saving the linework, save it without a version number. The flatted page will be saved with a version number to differentiate it.

RESIZING - Since working at 600 dpi will be asking too much of most computers, we'll have to shrink the file to 300 dpi for the color work. Set the Resolution to 300 pixels/inch, set the image mode to CMYK, and save the file in a separate folder with "_v01" added to the file name. For example, this page will be called "amulet_039b_v01.psd"

DEFINING LAYERS - Double-click the background layer to turn it into "Layer 0", and then change its name to "linework". Turning the background into a regular layer allows you to move it up and down the layer list. In its original state, the layer is locked and other layers cannot be placed beneath it.

SELECTING PANELS - Make a new layer below the linework layer called "bg" and go back to the linework layer. Use the magic wand tool to select the area outside of the panel borders. Press Ctrl+Shift+i to inverse the selection so that it is the material inside of the panel borders that are now selected.

MULTIPLY - Change the linework layer to a multiply layer by selecting from the drop down menu. This will make it so you can see through all of the white space on the page, leaving only the blacks showing.

BACKGROUND LAYER - Now select the bg layer and fill it with a color (to select colors, use refs). Not only does this layer serve as the home for the background images but it will also serve as a great selection tool when working from panel to panel. A shortcut for filling a space with the selected foreground color is Alt+Backspace. For filling with the selected background color, press Ctrl+Backspace. I use these shortcuts regularly. And when I talk about foreground and background color, this is what I mean:


CREATING TEXT BUBBLES - Use the linework layer again to select the word bubbles using the magic wand tool. Be sure the magic wand is set to "contiguous" or it will select everything in the same color range as the selection. You can find this option at the top of your screen, just below the menu bar, when you select the magic wand tool.


Create a layer called "text bubbles" and fill the selection with white. Again, use Alt+Backspace or Ctrl+Backspace to fill.

Because the word bubble selection leaves the text areas unselected, we'll have to fill in the blanks. Turn off the linework layer and with a solid white brush, fill in the areas that are left open on the text bubbles layer.

The finished word balloons should look like this.

CHARACTER LAYERS - This is where the real work begins. You'll find that even though the information above may sound complicated, you can get through all of that in a matter of minutes. However, it is the flatting of the character and object shapes that takes the most time.To begin, you want to create a new layer just above the bg layer. We'll call it "c1". Since there is often more than one character on the page that overlaps, be sure to only put multiple characters on this layer if they do not overlap. If they do, we will just create a new layer to accomodate them. Fill the character shapes with a single color, preferably their skin color (see color ref).

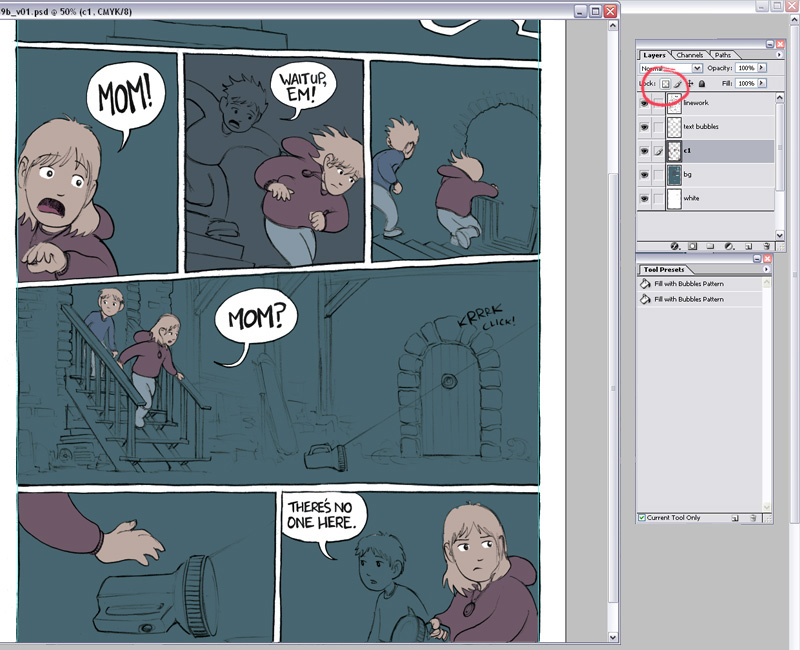
ADDING BASE COLORS - Once the character layer is blocked in, click on the "lock" option for the layer in the layer panel (looks like a grey checkboard). This will allow you to paint freely without leaving the areas that have already been painted on, working much the same way as masking tape. Select the proper local colors for the characters' clothes and eyes, and with a solid brush, apply accordingly. Remember to keep this on the character layer. Do not create new layers for the clothing. Having too many layers can slow down the painting process considerably.
Also, leave the hair color alone for a later stage.

ADDING MORE CHARACTERS - When faced with overlapping characters, just add new layers for them. I generally recommend doing this before the local color stage, so this is just slightly out of sequence.

HAIR - Hair gets its own layer because selecting it is always a pain in the butt. Create a new layer for the hair, and fill in the areas accordingly. One quick tip would be to use the character layers as selection tools. While on the hair layer, hold down the Ctrl button and left click the character layers. You will remain on the layer you want to work on, but the characters will be selected. Hit Ctrl+h to hide the ant trails and continue working.Added quick tip: Hit Ctrl+d to deselect any time.

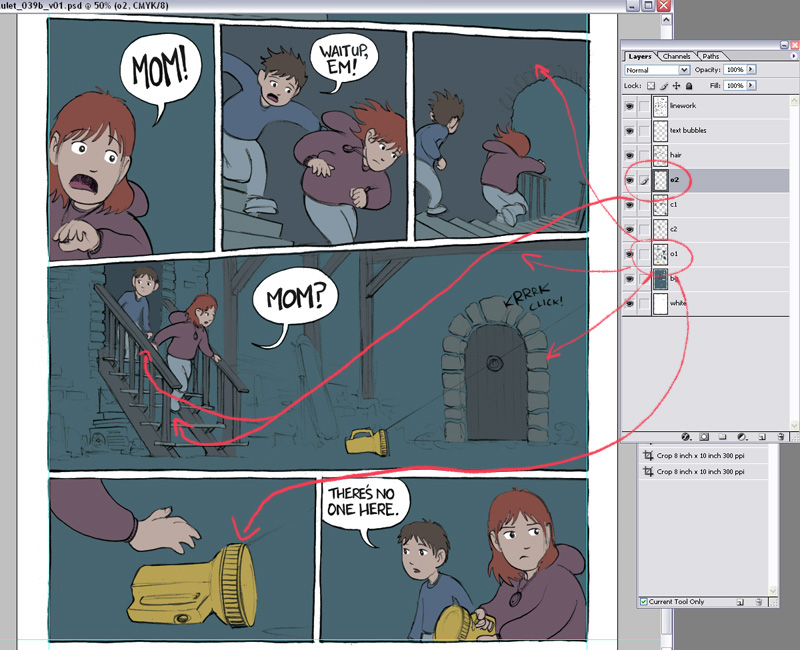
OBJECT LAYERS - The final stage in the process is to add the objects in the environment. Generally, I like to keep the background elements clustered together, but there are always some things (such as the bannister above) that tend to get in the way of coloring characters and such. For cases like these, and for more obviously defined objects such as the flashlight, be sure to create a new layer. There are often 2 to 3 object layers per page, depending on where these objects are located. In this instance, there are two. One for the foreground elements and one for the background elements.

When all is said and done, the page should look like this. The page is now ready to be colored. Be sure to save the file!